RECYCLING WHEN CYCLING: 8 DIY IDEAS FOR THE ROAD
If there’s something I absolutely love it’s creating things with my hands and giving new purposes to old things. I’m the youngest of seven children, so you can take a wild guess on how much new stuff I used to receive as a child. The answer is slim to none and I’m grateful for it, because it has taught me to appreciate everything second-hand and recycled. When cycling long-distance, it’s quite heavy to carry handicraft supplies with you, so you often need to search for things to do with whatever is around. Here’s the DIY ideas I’ve come up with in Paraguay. Enjoy!
Note that only one of these ideas is originally my own.
1. Bottle cap earrings
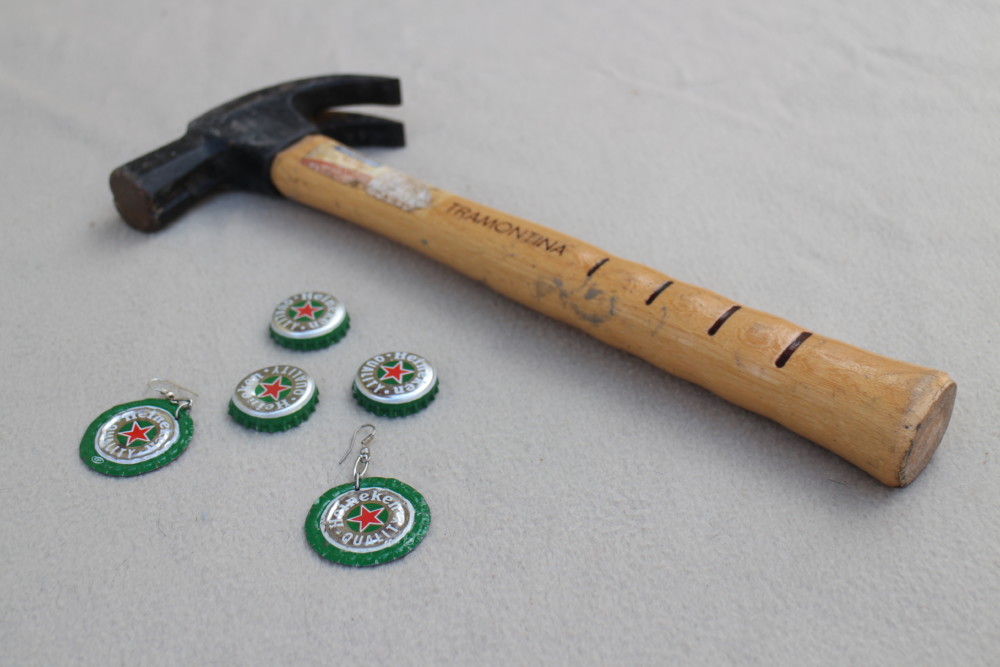
This is one of my all-time favorites: fast and easy earrings which are light to use. Take two bottle caps and two ear wires and you’re almost done. What you need are pliers to hold the caps in place and a hammer to flatten them down. The flattening process needs to be gradient and done patiently to avoid the borders of the cap from turning inwards. Once you’ve successfully flattened one of the caps, flatten the other one. Then make a hole in both of the caps with a nail and hammer, and pass an ear wire through the holes. Voilà!
2. Rustic fire staff
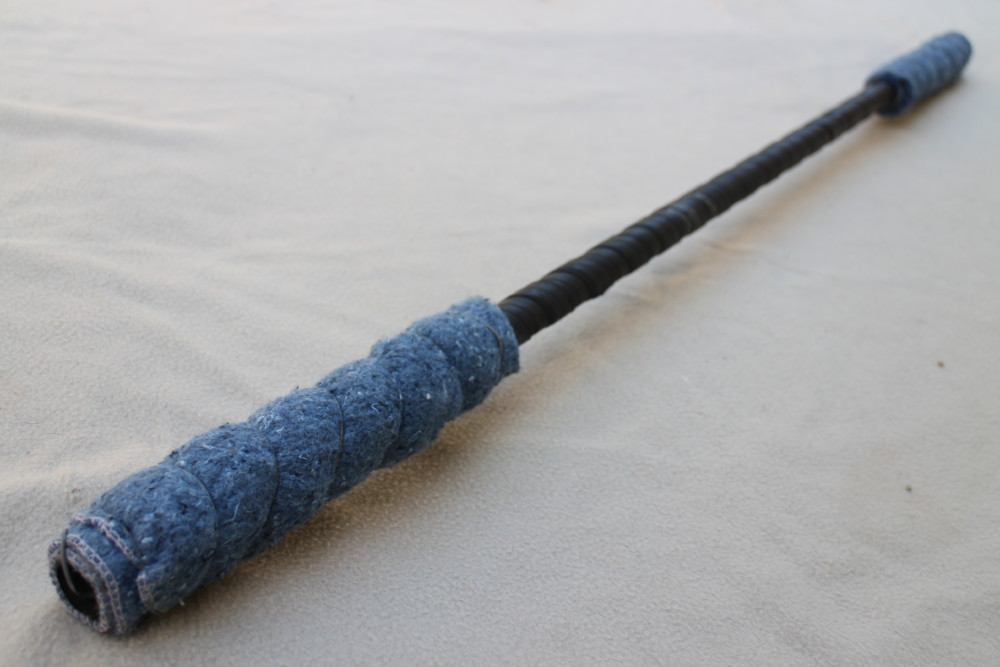
There are many ways to do a fire staff, but this is perhaps the easiest and the most rustic. All you need is an iron or aluminum pole, a towel and some iron thread. If you want to add friction to the pole, you can use an old inner tube of a bicycle to cover it. (This is what I did, as I had a worn down spare with me). Once you have everything you need, cut the inner tube so that it’s not a tube anymore, wrap it around the pole and attach it to its ends with electrical tape. Then cut a towel in half and wrap it around the ends of the pole with iron thread. Dip the ends in kerosene (or whatever fuel you prefer) and your ready to spin!
3. Milk carton wallet
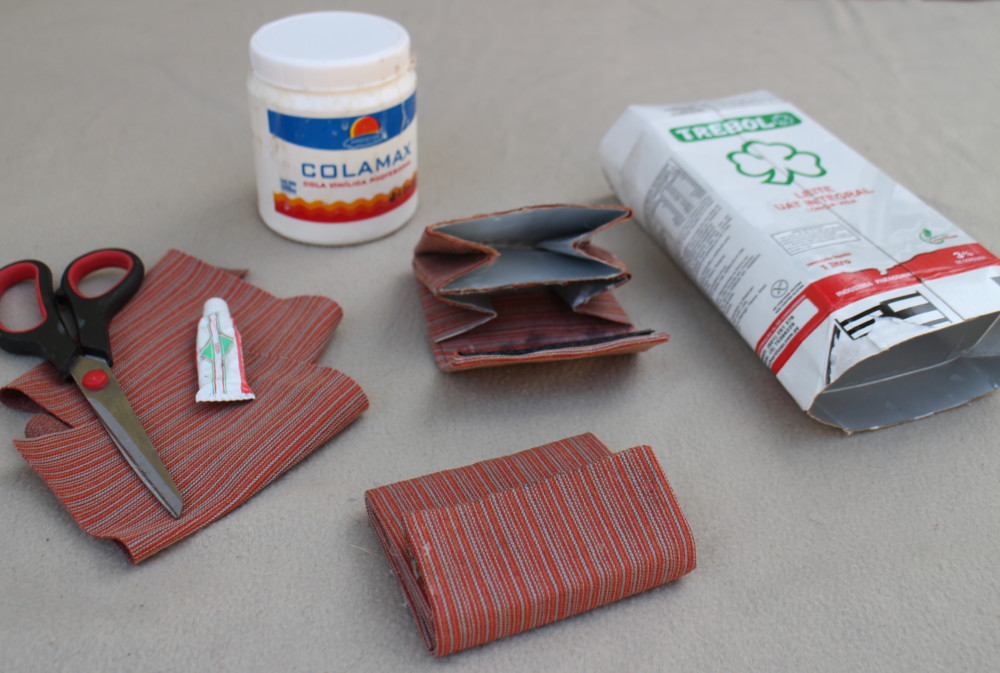
This is maybe the coolest invention ever! I first saw this more than 14 years ago, but only now finally tried it out myself: wallet out of milk/juice carton! I was going to make a tutorial for this, but just got too carried away with doing it and forgot all about the camera. However, all you need for this is an old milk/juice carton, scissors and glue, oh and something to close the wallet with. You just cut the milk carton a bit, fold it in half and glue it together. If you want to make it more fancy, you can also glue some fabric on it. If the carton has nice colors, it’s not necessary though.
4. Decoupage
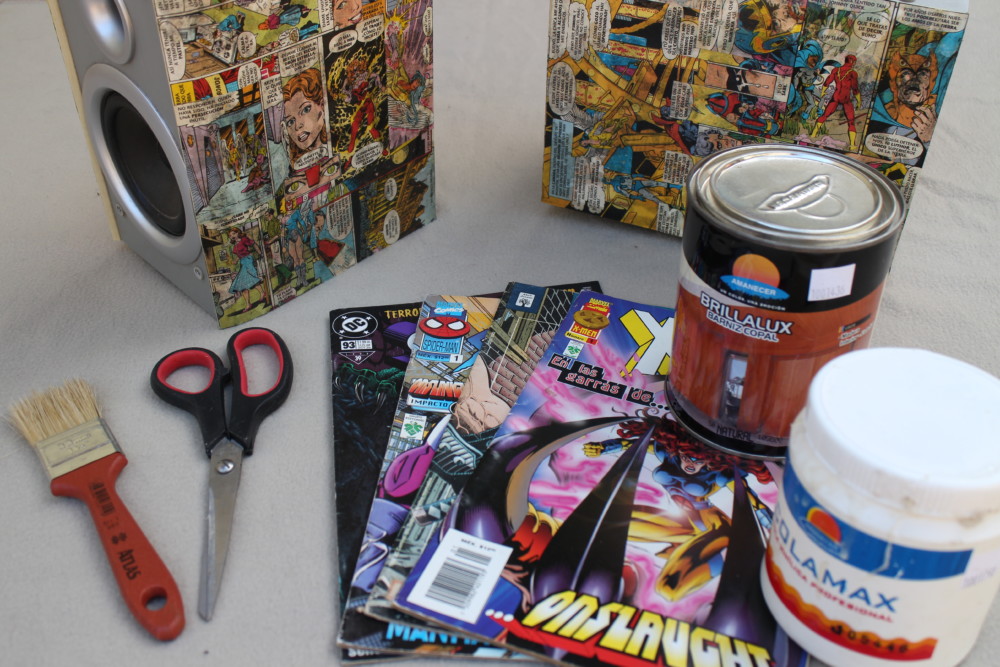
So, the house I’m staying at is full of old magazines and comics. With my host César’s permission (and help), I made some decoupage (covered things) with them. If you happen to have old newspapers or comics lying around, I strongly recommend to do this! It gives a funky new flair to old things. Just cut out pieces of newspapers and glue them on whatever it is you want to cover. Then “paint” the pieces over with a couple of layers of glue, and in the end add varnish for protection and for giving the decoupage it’s classy, glossy look.
5. Drinking glass from bottle
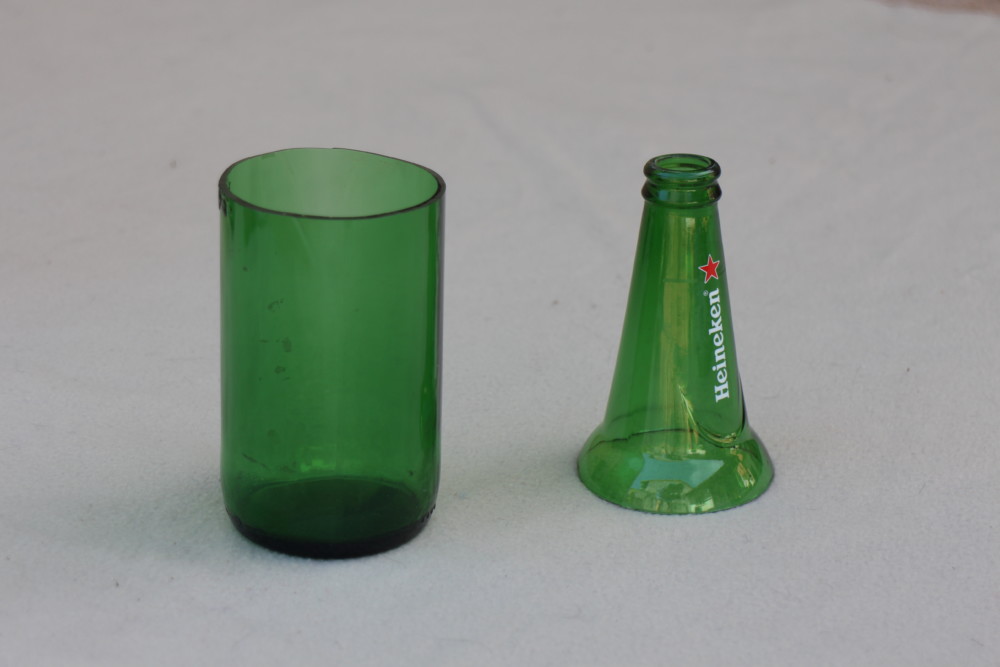
In Finland, all beer and wine bottles are recycled. However, in Paraguay they aren’t. As I don’t feel comfortable throwing glass bottles away, I finally tried out something I’ve seen in a couple of houses in South America: drinking glasses made out of bottles. What you need is an electric resistance, a power line and some tiles and you can make your own, personalized glasses. However, you can honestly end up electrocuted unless you do everything right, so I won’t even try to get into detailed instructions here.
6. Self watering plant vase
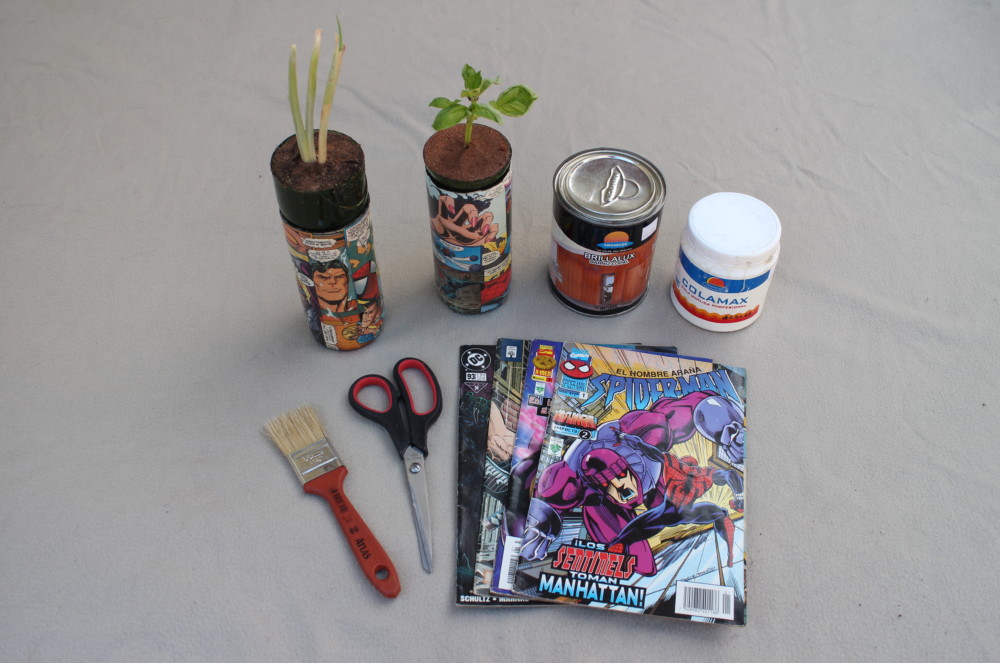
These self watering plant vases are done with the same system as the drinking glasses. Cut a bottle in half and grab hold of the bottle neck. Stick a piece of rope/fabric/shoe lace inside the drinking side of the neck and turn it around. Then, fill the neck first with tiny pebbles and then with soil and your plant. Fill the bottom of the bottle with water which touches the rope and water the plant from the top. The water will slowly drip to the bottom through the soil and the rope will bring it back up. If you want, you can decorate the vases with the decoupage system described above.
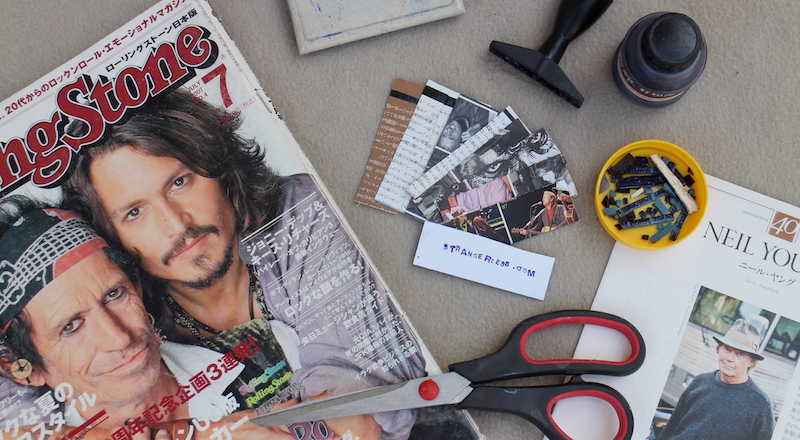
7. Stamp and business cards
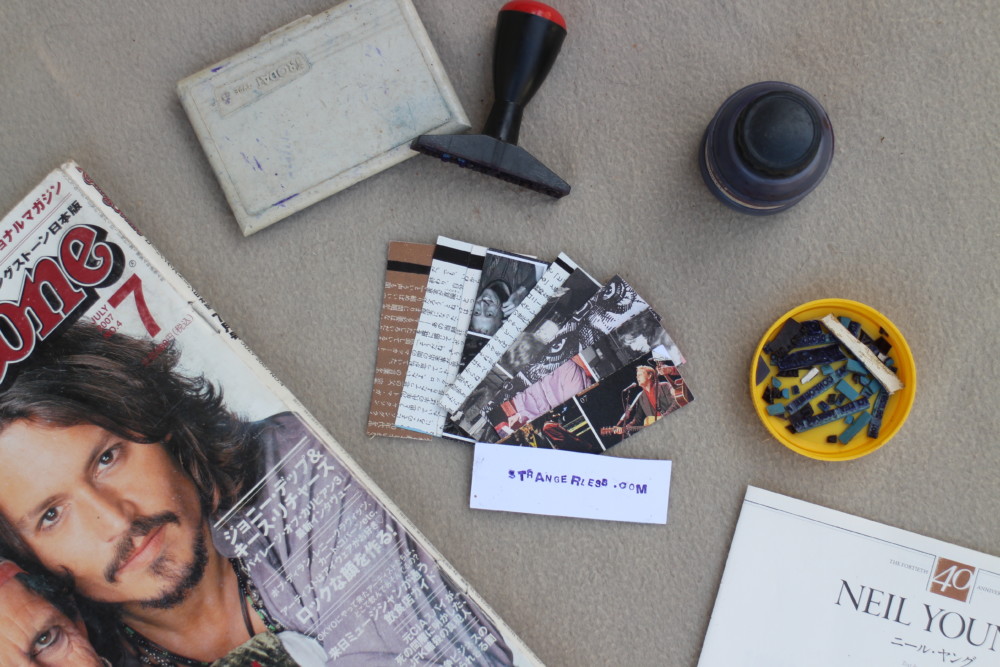
I made myself much needed business cards out of small colorful cards found lying around the house I’m staying at. If you want to do the same, just take any old colorful cardboard and cut it into small pieces. On the other side of these pieces glue pieces of magazines or comics (I used old Japanese Rolling Stone magazines which I also found lying around…sorry, Mela!). Last but not least, I put together a www.strangerless.com stamp with letters taken apart and cut out from various old stamps. These I just simply glued on one of the stamp bases.
8. Bicycle chain necklace
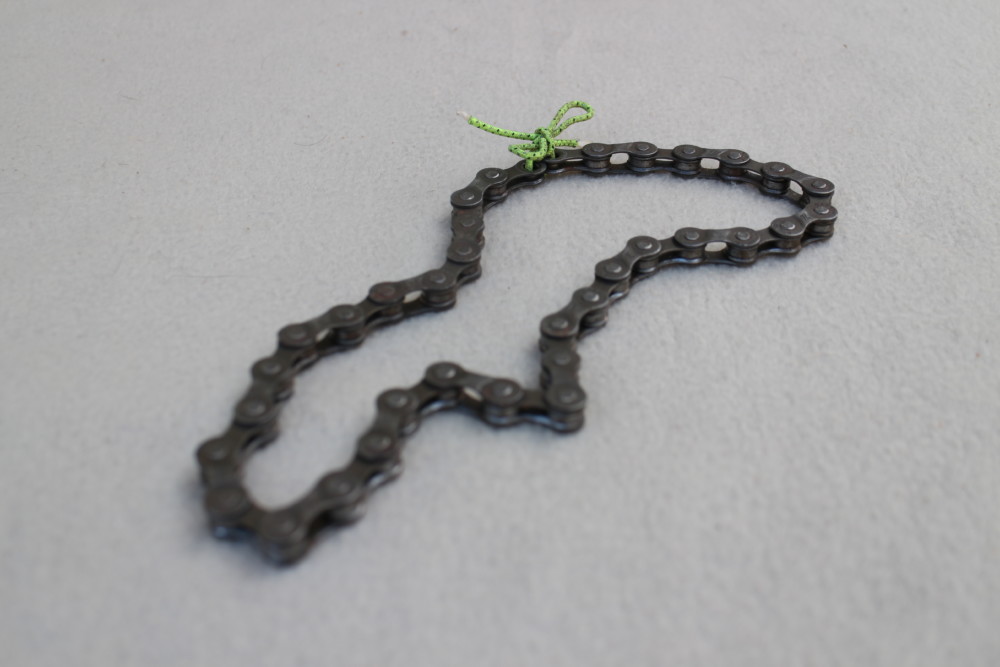
This is obviously the most desperate, cycling-related invention I’ve had on this trip. As my chain broke down, I carried it around with me for a while just in order to come up with something to do with it. A chain is a damn heavy thing to carry with you, so to finally get rid of it, I started making necklaces to give out to people I meet on the road. There are zillions of things cyclists make out of used chains, yet this one is for sure the simplest. All you need to do is cut out a piece of chain and tie it together with rope. I did this with the ropes of my old tent.